
How to - Seequent ID - Administer Subscriptions

Jun 25, 2024
In this article we explain how to administer GeoStudio license subscriptions if you are the Seequent ID account administrator for your organization.
Before You Start
- Account administrator access is granted by the Bentley License Provisioning team for shared subscriptions when your licenses are created.
- Account administrator access is not available for named subscriptions.
- Requests for changes to the account administrator should be directed to the Seequent License team.
Log in to Seequent ID
- To access license subscriptions for your organization, log in to your Seequent ID account using the following link:
https://my.seequent.com/ - From the pane on the left, expand the 'Subscriptions' tab:

- Click on 'Administration'.
User Administration
- To administer user options, select the 'USERS' tab from the top right:

Add Users
- To add a new user, click on the 'Add Users' button at the top right.
- Enter the user email address in the space provided.

- Multiple users can be added during a single operation if you separate each email address with a comma.
- ***Helpful hint*** Use a spreadsheet to create your user list:
- Put your list of email addresses in column A.
- In column B, enter the following formula:
=CONCAT(A1,",") - Drag-fill down the formula in column B, beside all of the email addresses.
- Copy and paste the values of the concatenated text into the My Seequent admin portal.
- ***Helpful hint*** Use a spreadsheet to create your user list:
- When you are ready to add them, click on the 'Add Users' button.
- The user will show as 'INVITED' in the user list:

- The user will receive an invitation email. They will need to sign in and accept the invitation:

- After signing in, they will see their invitation. They will need to click on 'Accept':

- After clicking 'Accept' they will receive a successful invitation notification at the top-right of the page:

Assign Subscriptions to Users
- Select the user from the list.
- Either enter the subscription name or select it from the drop-down list:

- Click on the 'Assign Seats' button:

- When the subscription is added successfully, you will receive a notification at the top-right:

- The subscription information will be displayed in the list:

- If the 'Email User' notification box is checked, the user will get an email notification about their new subscription.

Remove Subscriptions from Users
- Select the user from the list.
- Beside each subscription is an 'x' icon. Clicking this will remove the subscription from the user:

- Clicking the 'x' icon will display a warning:

- Click on 'Yes, remove the subscription' to proceed.
- When the subscription is removed, you will receive a notification at the top-right:

- The subscription is now removed from the user.
Subscriptions Administration
- To administer subscriptions, select the 'SUBSCRIPTIONS' tab from the top right:

Add Users to Subscription
- Select the subscription from the list:

- This will display the subscription details and a list of assigned users:

- Enter a user name or select them from the drop-down list:
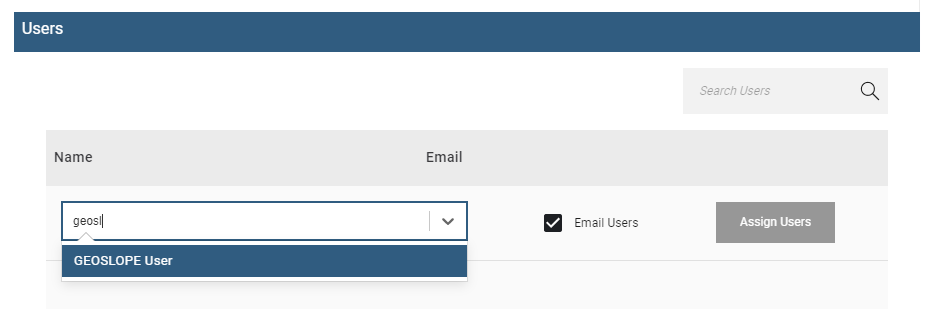
- You can add multiple users to a subscription at once as long as you have added them previously.
- When ready, click on the 'Assign Users' button.

- Click on 'Assign Users'.
- When the user is added successfully, you will receive a notification at the top-right:

- The user information will be displayed in the list:

- If the 'Email User' notification box is checked, the user will get an email notification about their new subscription.
Removing Users from Subscriptions
- Select the subscription from the list.
- Beside each user in the subscription is an 'x' icon. Clicking this will remove the user from the subscription:

- Clicking the 'x' icon will display a warning:

- Click on 'Yes, remove user' to proceed.
- When the user is removed, you will receive a notification at the top-right:

- The subscription is now removed from the user.

