
Problem - GeoStudio Crashes When Trying to Print

Sep 02, 2020
In this article we explain the troubleshooting steps to follow when GeoStudio crashing when trying to print.
Cause
- This can happen if there is a problem with your printer configuration.
Before You Start
- This process assumes the host operating system is Windows 10.
- One step requires uninstalling and re-installing your printer driver.
- Ensure you have the printer driver installer before performing that step.
Steps to Resolve
- Ensure GeoStudio is closed.
- On the 'Windows Taskbar', click on the 'Start' button (shortcut: Windows logo key or Ctrl + Esc).
- Click on the 'Settings' icon (shortcut: Windows logo key + I).
- Click on the 'Devices' icon.

- Select 'Printers & scanners' from the pane on the left.
- Uncheck the box 'Let Windows manage my default printer'.

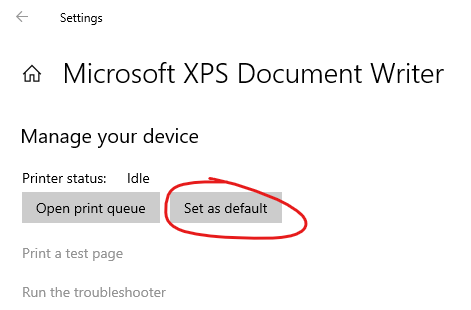
- Select a different printer to use as your default printer. A PDF Writer or the 'Microsoft XPS Document Writer' are good choices.

- After selecting the new printer, click on the 'Manage' button.

- Click on the 'Set as default' button.
- Close the 'Settings' window.
- Re-start GeoStudio and try printing to the new default printer.
- If GeoStudio does not crash, try switching back to the printer that caused the initial problem and see if you can print to it.
- If that doesn't solve your problem, try uninstalling the print driver for the problematic printer and re-install it.
- Select the printer to uninstall and click on the 'Remove device' button.

- At the top of the window, click on the 'Add a printer or scanner' button.

- If your printer shows up in the list of found printers, select it and click on the 'Add device' button.
- If your printer does not show up, click on the link 'The printer that I want isn't listed' and follow the instructions.
- Select the printer to uninstall and click on the 'Remove device' button.
- If you continue to experience problems printing after uninstalling and re-installing the print driver, create a crash dump file. Open a support ticket and attach the crash dump.

